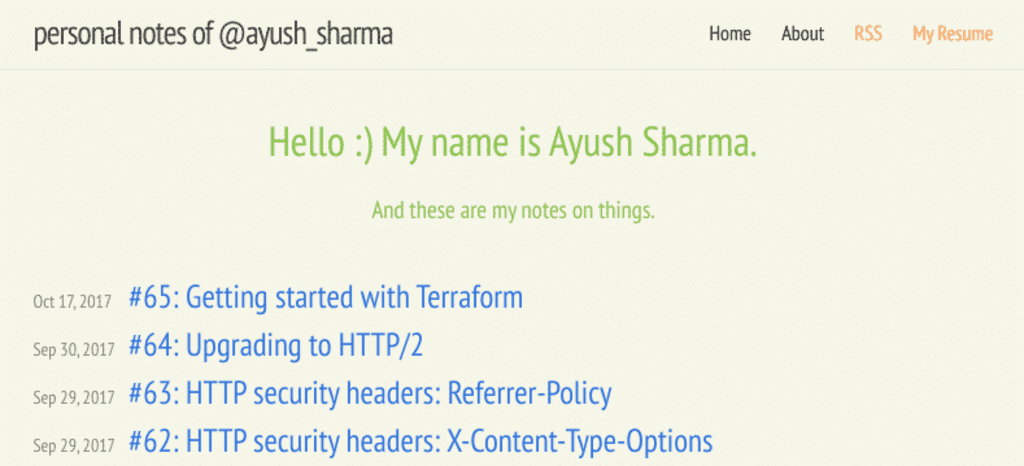
We have a blog or a website for different reasons. For me, this website has served as a nice playground to test random ideas. Given how much new information I have to deal with on a daily basis, it feels great being able to organise and freeze it somewhere online where I can see. I’ve been blogging in one medium or another for several years now, and I finally decided to host my server back in 2010. The website looked a bit like this:
The website is hosted on a single DigitalOcean droplet and it has been enough to host these personal notes that I publish now and then. But when CloudFlare took a stand against SOPA in 2011 to protect freedom and privacy online, I decided to take a deeper look at their product offerings. Finding a free CDN was a nice bonus, and I joined CloudFlare as a customer in 2012.
Since then, this website has run without issues. It doesn’t have to deal with a lot of traffic, and any sudden traffic spikes due to some new content, like the Disqus post that became popular, was within CloudFlare’s capacity to handle. And so this website worked without much intervention for a long time. Then things changed a few weeks ago.
I wanted to change the design of the website and make it more reader-friendly, so I had a design in mind that looked a bit like this:
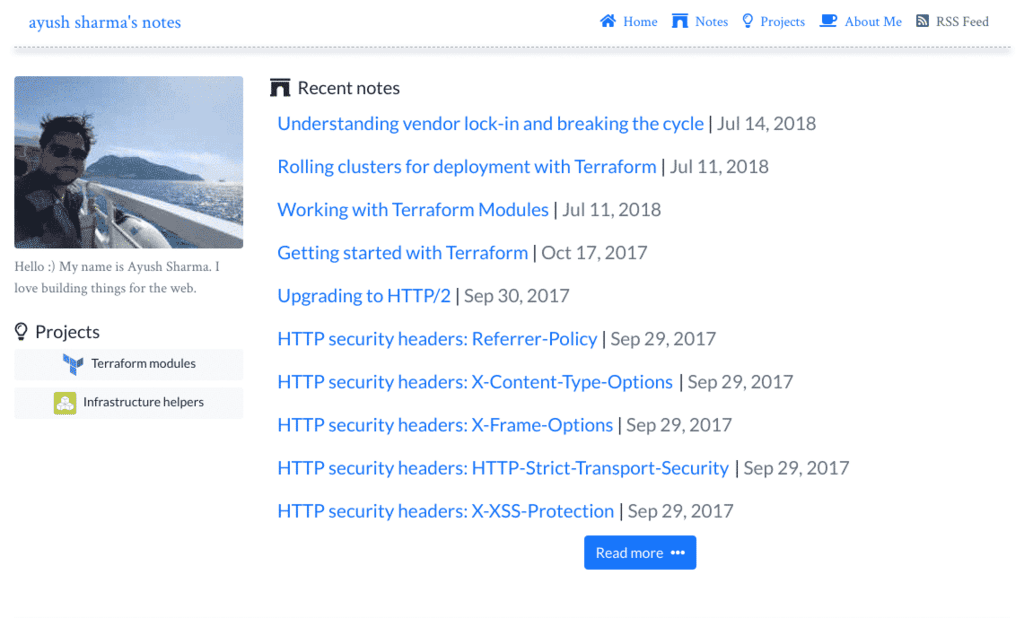
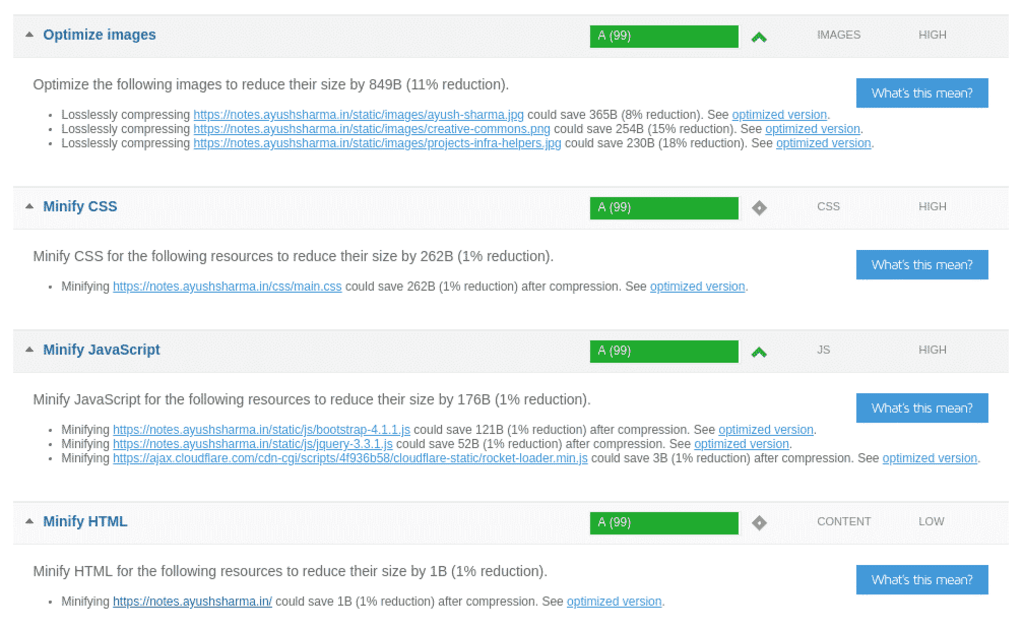
It seemed like a good design to get started iterating on. I began by taking some before-and-after GTMetrix tests for comparison to make sure the re-design was heading down the right path. And that’s when GTMetrix reported a few issues.
Unusual suspects
There were several problems in the GTMetrix tests: the time-to-first-byte for the website was more than 1 second, my CSS and JS assets were neither compressed nor cached, and CloudFlare would not failover and display my website from its cache if my origin droplet went down.
Basically, CloudFlare was not working as advertised.
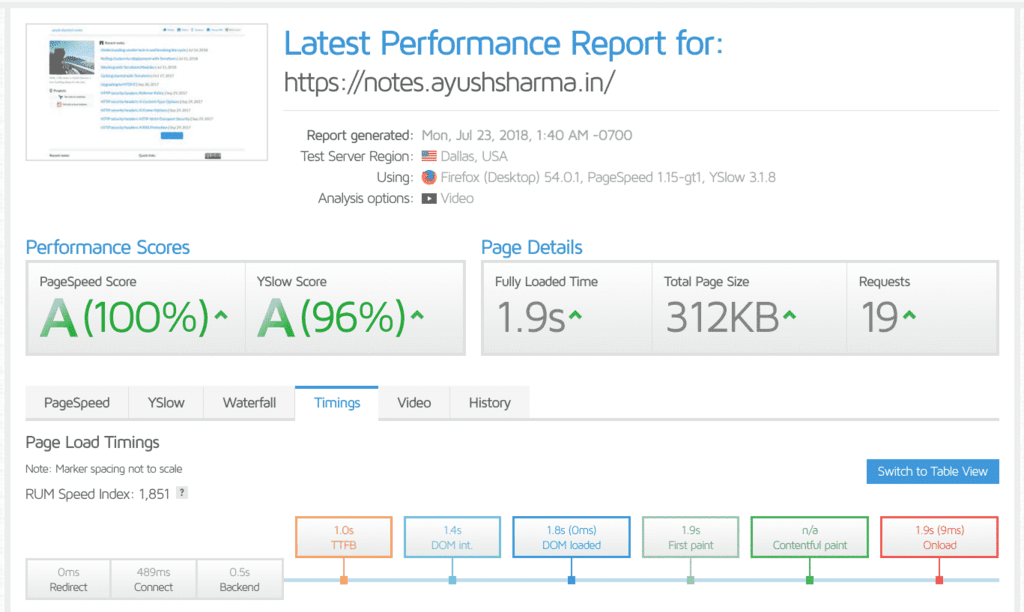
Running more tests showed an average time-to-first-byte of over 2 seconds. And in internet-time, that’s practically forever. It was time to call in the cavalry.
CloudFlare support to the rescue!?
To diagnose these issues, I reached out to CloudFlare support several times. They advised me to check my SSL configuration (which was correct), then to verify my caching settings for HTML, CSS and JavaScript (which were also correct), and then to verify my SSL configurations yet again (which were still correct). At one point I even removed SSL on my origin droplet and allowed CloudFlare to connect over plain HTTP, but the issue remained unresolved. My blog’s TTFB was still over 2 seconds, static resource caching was not working, and CloudFlare would not display my website from its cache if my origin went down. I finally received the following email from CloudFlare:
Essentially, you may see a larger TTFB because we don’t send data back until after we have connected to your web server and it has responded,
Therefore, if you would like to improve your TTFB, there are three considerations:
- Cache your HTML if appropriate. The guide to do that is here. This is up to you if you would like to implement but we would caution that for highly dynamic html this could cause problems (which is why we do not cache by default but do provide the option).
- Fine-tune your webserver to deliver html faster.
- If you are unable to do #1 or #2, then you may want to review this blog post on Cloudflare’s philosophy on the > TTFB metric: https://blog.cloudflare.com/ttfb-time-to-first-byte-considered-meaningles/ . Basically, we maintain that the TTFB is not the be-all and end-all of user-experience. Because you should be caching most of your content at the edge, on the whole, your website will still be loading faster than it would without Cloudflare.
If you have any additional questions or concerns please let us know.
Thank you,
So according to CloudFlare, my options were as follows:
- Option 1: Cache my HTML content on the origin to deliver it faster, nevermind that CloudFlare is supposed to do this already.
- Option 2: “Fine-tune” my origin to speed things up, which is quite vague to say the least.
- Option 3: Not to worry my pretty little head about it because TTFB is bullshit anyway.
Right, then.
So long, and thanks for all the fish.
Looking for Alternative CDNs
A quick web search on DuckDuckGo will tell you that StackPath is one of the best CDNs around, especially with my spending budget around the “free” range. With StackPath, for a quick $10 I could get a world-class CDN up and running in a matter of minutes. Moving from CloudFlare to StackPath required the following:
- Change my domain’s name-servers back to my domain provider.
- Point my StackPath CDN to my origin server.
- Point my main website to StackPath’s CDN CNAME record.
- Delete my website from CloudFlare (optional, but satisfying).
- Delete my account from CloudFlare (optional, but more satisfying).
The first point on this list is important, because I gave up my domain’s name server’s to CloudFlare when I first signed up. Changing them back may take up to 24 hours to propagate globally, so be ready for some migration headaches. Ideally you’ll want your StackPath set up already working before you decide to take back your name-server records.
A speedy website is a happy website
The results? Take a look:
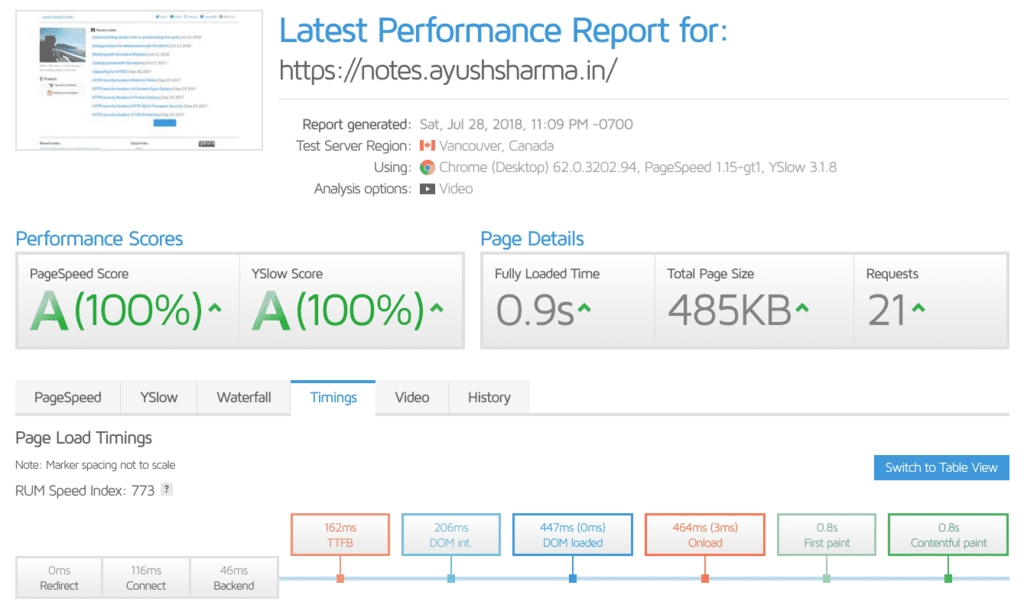
My time-to-first-byte is now down to ~150ms. Which is lower than ~2000ms, not that CloudFlare would care. They seem to think its all in my head.
A Fresh Start
After such a major breakup, a fresh start in a new environment sounded like a good idea. For my droplet, at least. I could move it from Bangalore to Amsterdam and see if some fresh air and legal weed did it some good.

But I wasn’t going to manually hack away at it now that I knew so many new things, so it was time to play with Packer and Terraform again. The plan would be simple:
- Create a
bashfile to provision my droplet along with all dependencies. - Bake the above
bashfile into a Packer file and use it to create a DigitalOcean Image. - Use Terraform to launch a new droplet the above image.
- Remap a floating IP address to new instance.
- Configure StackPath with the new floating IP.
Provisioning a new Jekyll blog
We can set up a new Jekyll blog on a Ubuntu 18.04 droplet by executing the shell file below:
#!/bin/bash

set -x

# Step 1: Configure localization
export LC_CTYPE=en_US.UTF-8
export LC_ALL=en_US.UTF-8
export LANG=en_US.UTF-8
cat << EOF >> /home/ubuntu/.bashrc
export LC_CTYPE=en_US.UTF-8
export LC_ALL=en_US.UTF-8
export LANG=en_US.UTF-8
EOF
cat << EOF >> /root/.bashrc
export LC_CTYPE=en_US.UTF-8
export LC_ALL=en_US.UTF-8
export LANG=en_US.UTF-8
EOF

# Step 2: Upgrade Ubuntu dependencies and install Git + Nginx + Ruby + misc
add-apt-repository -y ppa:certbot/certbot
apt-get -y update
apt-get -y -o Dpkg::Options::="--force-confdef" upgrade
apt-get -y install git htop nginx pv python-certbot-nginx ruby ruby-dev build-essential
apt-get -y autoremove
apt-get -y clean

# Step 3: set up Ruby and Jekyll
echo '# Install Ruby Gems to ~/gems' >> ~/.bashrc
echo 'export GEM_HOME=$HOME/gems' >> ~/.bashrc
echo 'export PATH=$HOME/gems/bin:$PATH' >> ~/.bashrc
source ~/.bashrc
gem install jekyll bundler
bundle update jekyll

# Step 4: set up SSH keys uploaded from Packer. We'll need these for read access to our repos.
mkdir -p /home/ubuntu/.ssh
cp /tmp/private_key /home/ubuntu/.ssh/id_rsa
cp /tmp/public_key /home/ubuntu/.ssh/id_rsa.pub
mkdir -p /root/.ssh
mv /tmp/private_key /root/.ssh/id_rsa
mv /tmp/public_key /root/.ssh/id_rsa.pub
chown -R ubuntu:ubuntu /home/ubuntu/.ssh/id_rsa*
chmod -R 400 /home/ubuntu/.ssh/id_rsa*
chown -R root:root /root/.ssh/id_rsa*
chmod -R 400 /root/.ssh/id_rsa*

# Step 5: Clone our blog repo from Bitbucket.
ssh-keyscan -H bitbucket.org >> /home/ubuntu/.ssh/known_hosts
ssh-keyscan -H bitbucket.org >> /root/.ssh/known_hosts
cd ~
git clone git@<bitbucket-repo-path>

# Step 6: Copy Nginx configuration files.
cp /tmp/nginx.sites-available.default /etc/nginx/sites-available/default

# Step 7: Build our Jekyll blog
cd ~/blog
jekyll build
cd /var/www
rm -rf *
cp -r ~/blog/_site/** .
chown -R www-data:www-data .

# Step 8: Restart Nginx. If this fails, the Packer build will fail.
service nginx restart
A few things to review in the script above:
- To access remote repositories for our code, we’re going to need to generate an SSH key pair and upload it to our new droplet. That’s what we’re doing in
Step 4. We’ll upload these using Packer in the next step. - In
Step 6, we’re uploading our custom Nginx configuration to our machine. We can use this step to upload any other configuration, like LetsEncrypt certificates, etc. - In
Step 8, in case the Nginx restart fails, our Packer build will fail and we’ll need to correct any errors before we proceed.
Creating the Packer Image
I’ve covered using Packer for Amazon Web Services before, and using it for DigitalOcean is similar. To do that, we need to generate an API token. Head over to the “APIs” section and click “Generate New Token”. Save the token somewhere safe.

Once we have our token, we need to add it to our system environment so Packer can use it. You can do that using the following command:
export DIGITALOCEAN_API_TOKEN="<token>"
Next, we’ll need to build our Packer provisioning setup. The packer.json build file for our machine above will look like this:
{
	"builders": [
		{
			"type": "digitalocean",
			"image": "ubuntu-18-04-x64",
			"region": "ams3",
			"size": "s-3vcpu-1gb",

			"droplet_name": "packer-blog",
			"snapshot_name": "packer.notes.ayushsharma.in.",
			"snapshot_regions": ["ams3"],

			"ssh_username": "root"
		}
	],
	"provisioners": [
		{
			"type": "file",
			"source": "provision/private_key",
			"destination": "/tmp/private_key"
		},
		{
			"type": "file",
			"source": "provision/public_key",
			"destination": "/tmp/public_key"
		},
		{
			"type": "file",
			"source": "provision/nginx.sites-available.default",
			"destination": "/tmp/nginx.sites-available.default"
		},
		{
			"type": "shell",
			"execute_command": "chmod +x {{ .Path }}; sudo -S sh -c '{{ .Vars }} {{ .Path }}'",
			"script": "provision/setup.sh"
		}
	]
}
If you look at the provisioners section, we’re uploading our SSH keys and setup.sh provisioning file to set up our droplet. We’ll add the SSH keys to BitBucket or Github so we can download our blog repository and set it up. The output of the The Packer build should look something like this:
digitalocean output will be in this color.

==> digitalocean: Creating temporary ssh key for droplet...
==> digitalocean: Creating droplet...
==> digitalocean: Waiting for droplet to become active...
==> digitalocean: Waiting for SSH to become available...
==> digitalocean: Connected to SSH!
==> digitalocean: Uploading provision/private_key => /tmp/private_key
==> digitalocean: Uploading provision/public_key => /tmp/public_key
==> digitalocean: Uploading provision/nginx.sites-available.default => /tmp/nginx.sites-available.default
==> digitalocean: Provisioning with shell script: provision/setup.sh
---
==> digitalocean: Gracefully shutting down droplet...
==> digitalocean: Creating snapshot: packer.notes.ayushsharma.in.1532568851
==> digitalocean: Waiting for snapshot to complete...
==> digitalocean: Destroying droplet...
==> digitalocean: Deleting temporary ssh key...
Build 'digitalocean' finished.

==> Builds finished. The artifacts of successful builds are:
--> digitalocean: A snapshot was created: 'packer.notes.ayushsharma.in.1532568851' (ID: XXXXXXXX) in regions ''
Launching our new box with Terraform
From the output of Packer above, we’ll need to note the DigitalOcean Image ID in the last line: ID: XXXXXXXX. Using this image ID, we can prepare a Terraform file to create a new droplet. You can review the basics of Terraform before we get started.
variable "do_token" {}

provider "digitalocean" {
	token = "${var.do_token}"
}

resource "digitalocean_droplet" "notes-ayushsharma-in" {
	image = "XXXXXXXX"
	name = "notes.ayushsharma.in"
	region = "ams3"
	size = "s-3vcpu-1gb"
	backups = true
}
We can run the above Terraform file with the following command:
terraform apply -var "do_token=${DIGITALOCEAN_API_TOKEN}"
The output should look something like this:
An execution plan has been generated and is shown below.
Resource actions are indicated with the following symbols:
+ create

Terraform will perform the following actions:

+ digitalocean_droplet.notes-ayushsharma-in
id: <computed>
backups: "true"
disk: <computed>
image: "XXXXXXXX"
ipv4_address: <computed>
ipv4_address_private: <computed>
ipv6_address: <computed>
ipv6_address_private: <computed>
locked: <computed>
name: "notes.ayushsharma.in"
price_hourly: <computed>
price_monthly: <computed>
region: "ams3"
resize_disk: "true"
size: "s-3vcpu-1gb"
status: <computed>
vcpus: <computed>


Plan: 1 to add, 0 to change, 0 to destroy.

Do you want to perform these actions?
Terraform will perform the actions described above.
Only 'yes' will be accepted to approve.

Enter a value: yes

digitalocean_droplet.notes-ayushsharma-in: Creating...
backups: "" => "true" bv
disk: "" => "<computed>"
image: "" => "XXXXXXXX"
ipv4_address: "" => "<computed>"
ipv4_address_private: "" => "<computed>"
ipv6_address: "" => "<computed>"
ipv6_address_private: "" => "<computed>"
locked: "" => "<computed>"
name: "" => "notes.ayushsharma.in"
price_hourly: "" => "<computed>"
price_monthly: "" => "<computed>"
region: "" => "ams3"
resize_disk: "" => "true"
size: "" => "s-3vcpu-1gb"
status: "" => "<computed>"
vcpus: "" => "<computed>"
digitalocean_droplet.notes-ayushsharma-in: Still creating... (10s elapsed)
digitalocean_droplet.notes-ayushsharma-in: Still creating... (20s elapsed)
digitalocean_droplet.notes-ayushsharma-in: Still creating... (30s elapsed)
digitalocean_droplet.notes-ayushsharma-in: Still creating... (40s elapsed)
digitalocean_droplet.notes-ayushsharma-in: Creation complete after 49s (ID: 103383127)

Apply complete! Resources: 1 added, 0 changed, 0 destroyed.
At the end of the above process, our new DigitalOcean droplet will be up and running with our new website.
Giving our new box a floating IP
Terraform cannot map a floating IP to a new droplet as of now, but it’s easy enough to do from the web console. If you need help, see this forum question here.
Once the IP is mapped, head over to “Origin Settings” in your StackPath CDN and enter the new floating IP in “Origin Information”.
With the new droplet up and running, our floating IP and CDN origin configured, the website will be working at our CDN URL.
Wrapping things up
The process of moving away from CloudFlare was unpleasant, but necessary, and I’m glad I got an excuse to rebuild my droplet along the way. I hope CloudFlare is able to resolve these issues for others soon, but for now, the new CDN is workgin as advertised. If you’re facing similar issues, I hope these notes can offer some milestones for the road ahead.
Thanks for reading this far.